

This project integrates Meraki MV Cameras with Amazon Rekognition through their APIs to perform deeper image analysis.
Besides the specific technologies and use case developed under this project, its main purpose is to showcase the following workflow:
[ Video input ] --> [ Deeper image analysis ] --> [ Output ]Although the scripts are not generic to operate with every vendor out there in the market, they are meant to demonstrate the power of their APIs, and each of the three stages mentioned above could be easily adapted to other vendors or technologies. So… You have a smart camera that has open APIs? Do you enjoy using Azure Functions better than AWS Lambda? No worries! I think you’ll find this project useful either way 🤓
In this use case, the image analysis will be made to detect whether a person is wearing a facemask or not, and the results will be posted into a Webex space.
In the following video, I’m showcasing a demonstration of this integration. I highly encourage you to watch it before going over the setup process.
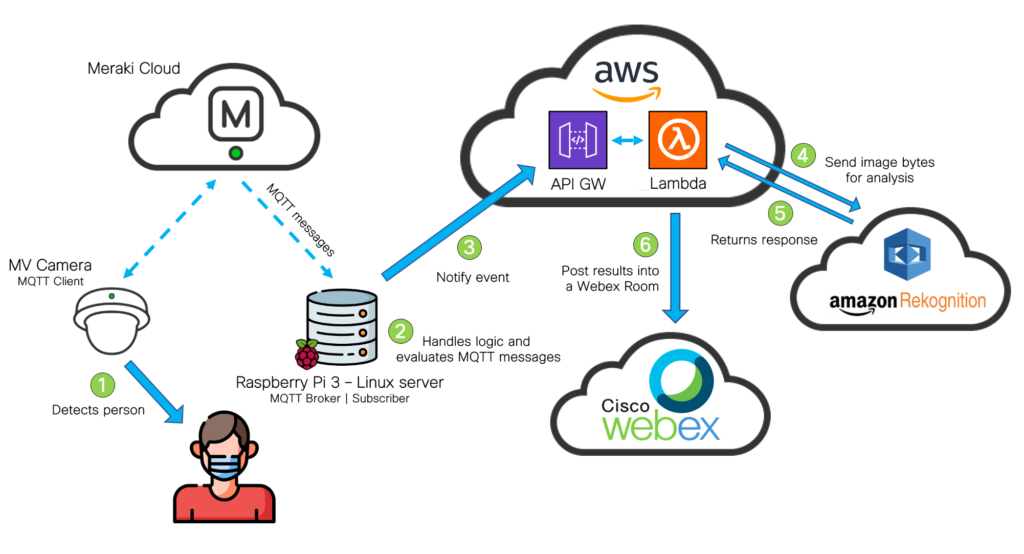
Workflow
The workflow will be the following:
Before we start: What do you need
- Access to a Meraki Dashboard (and its API key) with an MV Camera and MV Sense license available.
- An AWS Account, with an access and secret key created (Instructions on how to generate them)
- A Webex account. You will need it to create a Bot and grab its Access Token. You’ll find instructions on how to do it here.
- An MQTT broker reachable by the MV Camera. It can be configured on your laptop, or a separate server. In my case, I used a Raspberry Pi 3b+ with a Debian image, and I installed Mosquitto, an open-source MQTT Broker.
Usage
- Clone this repo in your local machine by typing on your terminal:
git clone https://github.com/agmanuelian/Meraki_Facemask_Detector.git- Install the required dependencies specified on the requirements.txt file:
pip3 install -r requirements.txt- Set up your MQTT Broker, and configure it on the Meraki Dashboard
- Select your MV Camera
- Go to Settings
- Select Sense
- Enable your MV Sense license
- Select Add or edit MQTT Brokers and configure its parameters.
- After you added your broker, select it on the dropdown list.
- Save your changes.
- Configure your credentials on the lambda_module/main.py file.
- On your AWS account, set up your Lambda Function. When it’s time to upload your code, zip the lambda_module directory, and upload the .zip file.
Lambda Setup – Step 1

After you do this, increase the execution time up to 15 seconds, under the Configuration tab
Lambda Setup – Step 2

- On your AWS account, set up your API Gateway. Once deployed, grab its public address. You will need it in the next step.
API Gateway Setup – Step 1

API Gateway Setup – Step 2

- Replace your credentials on the mqtt_trigger.py file. The API URL that you got in the previous step, should be added to the script on this step.
- Add your recently created bot to a Webex room. The bot access token and the Room ID should be already configured on the lambda_module/main.py file.
- Run the mqtt_trigger.py script. You should see displayed on the terminal a real-time feed of the detected people quantity. When a person gets in front of the camera, it will trigger the API call and process the function. The results will be posted in the Webex room.
Output
These are the results of the image analysis posted into a Webex space.

I hope you enjoyed this project!
If you found it helpful or if you have any questions, let me know in the comments section! 👨🏻💻😁